熟悉用 c++ 来编写可以跨平台的数据同步操作。
等待事件或条件 使用条件变量 之前在看 ostep 的时候熟悉过条件变量,但只是 Linux 平台下的。现在看看 c++ 标准库是如何使用的。
c++ 标准库在 <condition_variable>头文件中提供了 std::condition_variable和std::condition_variable_any两种条件变量。
其中 std::condition_variable只能与std::mutex结合使用,而std::condition_variable_any可以与任何具有互斥作用的对象结合使用。但是后者的效率比不上前者,所以大部分时候还是使用的 std::condition_variable。
最基本的使用如下:
1
2
3
4
5
6
7
8
9
10
11
12
13
14
15
16
17
18
19
20
21
22
23
24
25
26
27
28
29
30
31
32
33
34
35
36
37
38
39
std::mutex mut; std::condition_variable data_cond; std::queue<data_chunk> data_queue; void data_preparation_thread () while (more_data_to_prepare ()) { const data_chunk data = prepare_data (); { std::lock_guard<std::mutex> lk (mut) ; data_queue.push (data); } data_cond.notify_one (); } } void data_processing_thread () while (true ) { std::unique_lock<std::mutex> lk (mut) ; data_cond.wait ( lk,[]{return !data_queue.empty ();}); data_chunk data = data_queue.front (); data_queue.pop (); lk.unlock (); process (data); if (is_last_chunk (data)) break ; } }
在消费者线程中,使用的是std::unique_lock。这是因为当条件变量不满足的时候,需要主动释放互斥量然后进入睡眠。而std::lock_guard并没有提供这些灵活操作的接口(并且在获取数据的副本后,也会主动释放互斥量以提高系统的并发度)。wait方法的执行逻辑就如同下面这段代码一样:
1
2
3
4
5
6
7
8
9
10
template <typename Predicate>void minimal_wait (std::unique_lock<std::mutex>& lk,Predicate pred) while (!pred ()) { lk.unlock (); lk.lock (); } }
创建一个多线程安全的队列 我们可以基于前面的代码,将std::queue封装为一个多线程安全的队列:
1 2 3 4 5 6 7 8 9 10 11 12 13 14 15 16 17 18 19 20 21 22 23 24 25 26 27 28 29 30 31 32 33 34 35 36 37 38 39 40 41 42 43 44 45 46 47 48 49 50 51 52 53 54 55 56 57 58 59 60 #include <queue> #include <memory> #include <mutex> #include <condition_variable> template <typename T>class threadsafe_queue {private : mutable std::mutex mut; std::queue<T> data_queue; std::condition_variable data_cond; public : threadsafe_queue () { } threadsafe_queue (threadsafe_queue const & other) { std::lock_guard<std::mutex> lk (other.mut) ; data_queue = other.data_queue; } void push (T new_value) std::lock_guard<std::mutex> lk (mut) ; data_queue.push (new_value); data_cond.notify_one (); } void wait_and_pop (T& value) std::unique_lock<std::mutex> lk (mut) ; data_cond.wait (lk,[this ]{return !data_queue.empty ();}); value = data_queue.front (); data_queue.pop (); } std::shared_ptr<T> wait_and_pop () { std::unique_lock<std::mutex> lk (mut) ; data_cond.wait (lk,[this ]{return !data_queue.empty ();}); std::shared_ptr<T> res (std::make_shared<T>(data_queue.front())) ; data_queue.pop (); return res; } bool try_pop (T& value) std::lock_guard<std::mutex> lk (mut) ; if (data_queue.empty ()) return false ; value = data_queue.front (); data_queue.pop (); return true ; } std::shared_ptr<T> try_pop () { std::lock_guard<std::mutex> lk (mut) ; if (data_queue.empty ()) return std::shared_ptr<T>(); std::shared_ptr<T> res (std::make_shared<T>(data_queue.front())) ; data_queue.pop (); return res; } bool empty () const std::lock_guard<std::mutex> lk (mut) ; return data_queue.empty (); } };
在使用的时候就更加简洁了:
1
2
3
4
5
6
7
8
9
10
11
12
13
14
15
16
threadsafe_queue<data_chunk> data_queue; void data_preparation_thread () while (more_data_to_prepare ()) { const data_chunk data = prepare_data (); data_queue.push (data); } } void data_processing_thread () while (true ) { data_chunk data; data_queue.wait_and_pop (data); process (data); if (is_last_chunk (data)) break ; } }
如果想要同时唤醒多个线程,那就应该使用notify_all()方法。
信号量是 c++ 20 才提供的,如果在之前的版本要使用信号量,那就使用条件变量和互斥锁来实现信号量。被互斥的变量其实就是计数值:
使用future等待一次性事件 future 用于标识等待一个一次性事件的发生,一旦该事件发生了,其ready标记为真且无法被清除。
在 <future>头文件中提供了std::future<>和std::shared_future<>分别对应于独立和共享,就如同std::unique_ptr和std::shared_ptr一样。一个事件,只能有一个std::future<>与之关联。而多个std::shared_future<>可以关联同一个事件。
多个线程如果要并发的访问std::future<>则需要使用互斥量这些来保证互斥,而std::shared_future<>则没有这个限制。
获取线程的返回参数 假设需要一个线程来进行一个比较耗时的计算,如果使用std::thread来关联一个函数,那么获取其计算的结果还比较麻烦。这种情况下使用std::async与执行函数相关联,它会返回一个std::future以让使用者比较优雅的就可以获取到执行的返回值。
一个简单而优雅的示例如下:
1 2 3 4 5 6 7 8 9 10 11 12 13 14 15 #include <iostream> #include <future> static int find_the_answer_to_ltuae () return 1 + 1 ; } int main () std::future<int > the_answer = std::async (find_the_answer_to_ltuae); std::cout << "The answer is " << the_answer.get () << std::endl; return 0 ; }
std::async的也可以给执行函数传递参数,和std::thread的使用方式是一样的:
1 2 3 4 5 6 7 8 9 10 11 12 13 14 15 16 17 18 19 20 21 22 23 24 25 26 27 28 29 30 31 32 33 #include <string> #include <future> struct X { void foo (int ,std::string const &) std::string bar (std::string const &) ; }; X x; auto f1 = std::async (&X::foo,&x,42 ,"hello" );auto f2 = std::async (&X::bar,x,"goodbye" ); struct Y { double operator () (double ) }; Y y; auto f3 = std::async (Y (),3.141 );auto f4 = std::async (std::ref (y),2.718 ); X baz (X&) ;std::async (baz,std::ref (x)); class move_only {public : move_only (); move_only (move_only&&) move_only (move_only const &) = delete ; move_only& operator =(move_only&&); move_only& operator =(move_only const &) = delete ; void operator () () }; auto f5 = std::async (move_only ());
可以对std::async配置策略,以显示的指定其执行策略是同步还是异步:
1 2 3 4 5 6 7 8 9 10 11 12 auto f6 = std::async (std::launch::async,Y (),1.2 );auto f7 = std::async (std::launch::deferred,baz,std::ref (x));auto f8 = std::async ( std::launch::deferred | std::launch::async, baz,std::ref (x)); auto f9 = std::async (baz,std::ref (x));f7.wait ();
将 future 与一个任务关联 std::packaged_task提供了更为灵活的方式,它可以将一个可执行函数、可执行对象等与一个std::future绑定在一起,形成一个可执行对象。
然后这个可执行对象可以被同步或异步的被执行。执行的时候其返回值便会自动存储,而后可以通过关联的std::future来获取。
比如 std::packaged_task<std::string(std::vector<char>*,int)>打包后实例化的类就如同下面这样:
1
2
3
4
5
6
7
8
9
10
template <>class packaged_task <string (std::vector<char >*,int )> {public : template <typename Callable> explicit packaged_task (Callable&& f) ; std::future<std::string> get_future () ; void operator () (std::vector<char >*,int ) };
对于处理批量任务,使用这个打包的方式,可以将这种多个对象都放入容器中便于管理:
1 2 3 4 5 6 7 8 9 10 11 12 13 14 15 16 17 18 19 20 21 22 23 24 25 26 27 28 29 30 31 32 33 34 35 36 37 38 39 40 41 42 43 44 45 46 47 48 49 #include <iostream> #include <cmath> #include <thread> #include <future> #include <functional> int f (int x, int y) return std::pow (x,y); } void task_lambda () std::packaged_task<int (int ,int ) > task ([](int a, int b) { return std::pow(a, b); }) std::future<int > result = task.get_future (); task (2 , 9 ); std::cout << "task_lambda:\t" << result.get () << '\n' ; } void task_bind () std::packaged_task<int () > task (std::bind(f, 2 , 11 )) ; std::future<int > result = task.get_future (); task (); std::cout << "task_bind:\t" << result.get () << '\n' ; } void task_thread () std::packaged_task<int (int ,int ) > task (f) ; std::future<int > result = task.get_future (); std::thread task_td (std::move(task), 2 , 10 ) ; task_td.join (); std::cout << "task_thread:\t" << result.get () << '\n' ; } int main () task_lambda (); task_bind (); task_thread (); }
比如,GUI 有个独立的线程执行刷新任务,其它的任务要刷新线程必须要给这个 GUI 任务发送消息,这些线程或许还需要得到 GUI 线程执行该消息后的返回值。那么使用std::package_task就是合理的:
1 2 3 4 5 6 7 8 9 10 11 12 13 14 15 16 17 18 19 20 21 22 23 24 25 26 27 28 29 30 31 32 33 34 35 36 37 38 39 40 #include <deque> #include <mutex> #include <future> #include <thread> #include <utility> std::mutex m; std::deque<std::packaged_task<void ()> > tasks; bool gui_shutdown_message_received () void get_and_process_gui_message () void gui_thread () while (!gui_shutdown_message_received ()) { get_and_process_gui_message (); std::packaged_task<void { std::lock_guard<std::mutex> lk (m) ; if (tasks.empty ()) continue ; task = std::move (tasks.front ()); tasks.pop_front (); } task (); } } std::thread gui_bg_thread (gui_thread) ;template <typename Func>std::future<void > post_task_for_gui_thread (Func f) { std::packaged_task<void () > task (f) ; std::future<void > res = task.get_future (); std::lock_guard<std::mutex> lk (m) ; tasks.push_back (std::move (task)); return res; }
使用 std::promises std::promises和std::packaged_task很类似,也是可以通过其 get_future()方法获取一个std::future,然后它就可以组合使用。
std::packaged_task是用于执行一个函数,其返回值与std::future绑定。而std::promises是当其使用set_value()方法后,与其绑定的std::future便会是 ready 状态,如果std::future在其 ready 之前使用了 get()方法,那么将会阻塞的等待。
所以既可以使用std::promises实现线程间同步,也可以实现线程间的同步通信。
1 2 3 4 5 6 7 8 9 10 11 12 13 14 15 16 17 18 19 20 21 22 23 24 25 26 27 28 29 30 31 32 33 34 35 36 37 38 39 40 41 42 43 44 45 46 #include <vector> #include <thread> #include <future> #include <numeric> #include <iostream> #include <chrono> void accumulate (std::vector<int >::iterator first, std::vector<int >::iterator last, std::promise<int > accumulate_promise) int sum = std::accumulate (first, last, 0 ); accumulate_promise.set_value (sum); } void do_work (std::promise<void > barrier) std::this_thread::sleep_for (std::chrono::seconds (3 )); barrier.set_value (); } int main () std::vector<int > numbers = { 1 , 2 , 3 , 4 , 5 , 6 }; std::promise<int > accumulate_promise; std::future<int > accumulate_future = accumulate_promise.get_future (); std::thread work_thread (accumulate, numbers.begin(), numbers.end(), std::move(accumulate_promise)) std::cout << "result=" << accumulate_future.get () << '\n' ; work_thread.join (); std::promise<void > barrier; std::future<void > barrier_future = barrier.get_future (); std::thread new_work_thread (do_work, std::move(barrier)) ; std::cout << "wait result\n" ; barrier_future.wait (); std::cout << "wait result done\n" ; new_work_thread.join (); return 0 ; }
将异常存入 future 正常情况下,当一个函数抛出异常时,会层层向上传递,如果没有用户代码 catch 它,那么将会由标准库处理并退出用户进程。但是当使用了std::future,std::promises,std::packaged_task时,如果其关联函数抛出了异常,这个异常的值会被存储在 future 中。
使用std::promises来存储异常,然后在获取线程中获取异常才是一个优雅的做法:
1 2 3 4 5 6 7 8 9 10 11 12 13 14 15 16 17 18 19 20 21 22 23 24 25 26 27 28 29 30 31 32 33 34 #include <iostream> #include <stdexcept> #include <future> #include <thread> #include <chrono> static std::promise<int > result;void func_div (int a, int b) std::cout << "a = " << a << " b " << b << "\n" ; if (b == 0 ){ result.set_exception ( std::make_exception_ptr (std::out_of_range ("input out of range!\n" )) ); } else { result.set_value (a / b); } } int main (void ) std::thread t (func_div, 10 , 0 ) ; std::cout << "sleep 3 seconds\n" ; std::this_thread::sleep_for (std::chrono::seconds (3 )); std::cout << "get result\n" ; int ret = result.get_future ().get (); std::cout << "get result: " << ret << "\n" ; t.join (); return 0 ; }
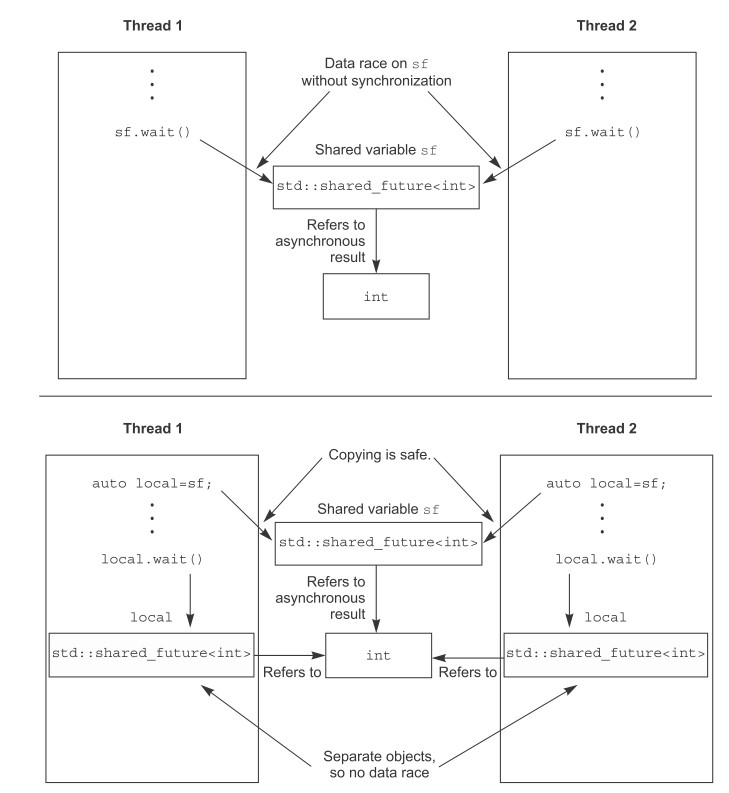
多个线程等待同一个事件 当有多个线程在使用同一个std::future时,便会造成竞态。这种情况下应该使用std::shared_future。
这并不是说多个线程使用同一个std::shared_future,而是说每个线程都有一份对std::shared_future的拷贝,它们都访问自己的std::shared_future:
std::shared_future是通过std::future来获取,又由于std::future是不能被拷贝的,只能被移动,所以需要使用std::move:
1 2 3 std::promise<int > p; std::future<int > f (p.get_future()) ; std::shared_future<int > sf (std::move(f)) ;
当然,对于创建的临时对象,也可以更加简单粗暴:
1
2
std::promise<std::string> p; std::shared_future<std::string> sf (p.get_future()) ;
除此之外,std::future也具有一个share()方法来创建std::shared_future:
1
2
3
4
std::promise< std::map< SomeIndexType, SomeDataType, SomeComparator, SomeAllocator>::iterator> p; auto sf = p.get_future ().share ();
超时等待 对于时间的设定,可以设置相对时间(比如等待 100 毫秒)和绝对时间(比如等待至 2023年……)。
c++ 标准库提供了这两种时间的设定,对于相对时间,其操作方法以_for作为后缀,对于绝对时间,其操作方法以_until作为后缀。
比如对于 condition_variable 的 wait() 方法就有 wait_for() 和 wait_until() 两种超时等待。
c++ 的时钟 c++ 标准库提供了头文件 <chrono>以支持时钟相关的操作:
std::chrono::steady_clock提供了具有固定不可被修改的时钟std::chrono::system_clock提供了通用时钟操作,可以被设定修改std::chrono::high_resolution_clock提供了高精度时钟操作
以上 3 个时钟都具有静态函数now()以获取一个绝对的时间点time_point。
时间段 ratio ratio头文件提供了模板类std::ratio<num, den>,其值代表分数,num就是分子(Numerator)的简写,den就是分母(denominator)的简写。
而在时间的角度来看的话,可以理解为num秒内有den次发生,也就是频率的表示。
比如 1毫秒,就是 1 秒内有 1000 次,那么就表示为:std::ratio<1,1000>。
该头文件还提供了很多实现定义的类型,便于用户直接使用:(详见cppreference )
定义
等同于
nano
std::ratio<1, 1000000000>
micro
std::ratio<1, 1000000>
……
……
1 2 3 4 5 6 7 8 9 10 11 #include <iostream> #include <ratio> int main (void ) std::cout << std::ratio<1 , 1000 >::num << "\n" ; std::cout << std::ratio<1 , 1000 >::den << "\n" ; std::cout << std::micro::num << "\n" ; std::cout << std::micro::den << "\n" ; return 0 ; }
输出为:
1
duration 头文件<chrono>提供了std::chrono::duration<Rep,Period>模板。
它与std::ratio联合使用,以表示在时间段内有多少个计数值。
第一个参数指定存储时间段的类型值,第二个参数指定std::ratio。
比如:
使用short存储一分钟的计数值:std::chrono::duration<short,std::ratio<60,1>>
使用double存储毫秒: std::chrono::duration<double,std::ratio<1,1000>>
为了方便,标准库还提供了std::nanoseconds, std::microseconds, std::milliseconds, std::seconds, std::minutes, std::hours等这些定义好的时间段值。
1 2 3 4 5 6 7 8 9 10 11 12 13 14 15 16 17 #include <iostream> #include <ratio> #include <chrono> int main (void ) auto t = std::chrono::seconds (2 ); std::chrono::duration<int , std::ratio<1 , 50 >> val (t); std::cout << "count of val " << val.count () << "\n" ; return 0 ; }
在 c++14 及以后,还提供了std::chrono_literals以使用字面值来表示时间段:
1
2
3
4
using namespace std::chrono_literals;auto one_day = 24 h;auto half_an_hour= 30 min;auto max_time_between_messages= 30 ms;
这样15ns 就等同于 std::chrono::nanoseconds(15):
1 2 3 4 5 6 7 8 9 10 11 12 13 14 15 16 17 18 #include <iostream> #include <ratio> #include <chrono> int main (void ) using namespace std::chrono_literals; auto t = 2 s; std::chrono::duration<double , std::ratio<60 , 1 >> val (t); std::cout << "count of val " << val.count () << "\n" ; return 0 ; }
std::chrono::duration_cast<>用于时间之间的转换,这里可能会有精度的损失(比如毫秒转换到秒):
1 2 3 4 5 6 7 8 9 10 11 12 13 14 #include <iostream> #include <ratio> #include <chrono> int main (void ) std::chrono::milliseconds ms (54802 ) ; std::chrono::seconds s = std::chrono::duration_cast<std::chrono::seconds>(ms); std::cout << "conver " << ms.count () << " ms to " << s.count () << " s\n" ; return 0 ; }
周期之间也可以进行简单的运算,比如 5 秒可以使用:5*seconds(1)或minutes(1) – seconds(55),它们都等同于 seconds(5)。
时间点 std::chrono::time_point<>用于表示一个绝对的时间点,它有两个参数。第一个参数用于表示这个时间点的参考时钟,第二个参数用于表示时间段:
1 2 3 4 5 6 7 8 9 10 11 12 13 14 15 16 17 18 19 20 21 22 23 24 25 #include <iostream> #include <ctime> #include <chrono> #include <ratio> #include <iomanip> int main () using namespace std::literals; const std::chrono::time_point<std::chrono::system_clock, std::chrono::duration<long long , std::ratio<1 , 10000000 >>> now = std::chrono::system_clock::now (); std::cout << "time since epoch with seconds " << std::chrono::duration_cast<std::chrono::seconds>(now.time_since_epoch ()).count () << "\n" ; const std::time_t t_c = std::chrono::system_clock::to_time_t (now - 24 h); std::cout << "24 hours ago, the time was " << std::put_time (std::localtime (&t_c), "%F %T.\n" ) << std::flush; return 0 ; }
对于使用相同参考时钟的时间点,也可以进行加减运算。比如下面经过时间点求差得出一段代码的运行时间:
1 2 3 4 5 6 7 8 9 10 11 12 13 14 15 16 17 18 #include <iostream> #include <ctime> #include <chrono> #include <ratio> #include <iomanip> int main () auto start = std::chrono::high_resolution_clock::now (); for (int i = 0 ; i < 0xffffff ; ++i){ } auto stop = std::chrono::high_resolution_clock::now (); std::cout<<"for loop took " << std::chrono::duration_cast<std::chrono::microseconds> (stop-start).count () << " microseconds" << std::endl; return 0 ; }
超时等待相关的函数 以延迟为例可以通过std::this_thread::sleep_for使用相对的延迟,和通过std::this_thread::sleep_until使用绝对延迟:
1 2 3 4 5 6 7 8 9 10 11 12 13 14 15 16 17 18 19 20 21 22 23 24 25 26 #include <iostream> #include <chrono> #include <ratio> #include <thread> int main () auto start = std::chrono::high_resolution_clock::now (); std::this_thread::sleep_for (std::chrono::seconds (2 )); auto stop = std::chrono::high_resolution_clock::now (); std::cout<<"relative delay took " << std::chrono::duration_cast<std::chrono::microseconds> (stop-start).count () << " microseconds" <<std::endl; start = std::chrono::high_resolution_clock::now (); std::this_thread::sleep_until (std::chrono::system_clock::now () + std::chrono::milliseconds (800 )); stop = std::chrono::high_resolution_clock::now (); std::cout<<"absolute delay took " << std::chrono::duration_cast<std::chrono::microseconds> (stop-start).count () << " microseconds" <<std::endl; return 0 ; }
除了延迟以外,其它的便是超时等待相关的函数。同样的,使用xxx_for便是相对时间,而使用xxx_until则是绝对时间。常用的功能函数总结如下:
std::this_thread::sleep_for / std::this_thread::sleep_untilstd::condition_variable::wait_for / std::condition_variable::wait_untilstd::condition_variable_any::wait_for / std::condition_variable_any::wait_untilstd::timed_mutex::try_lock_for / std::timed_mutex::try_lock_untilstd::recursive_timed_mutex::try_lock_for / std::recursive_timed_mutex::try_lock_untilstd::shared_timed_mutex::try_lock_for / std::shared_timed_mutex::try_lock_untilstd::shared_timed_mutex::try_lock_shared_for / std::shared_timed_mutex::try_lock_shared_untilstd::unique_lock<Mutex>::try_lock_for / std::unique_lock<Mutex>::try_lock_untilstd::shared_lock<Mutex>::try_lock_for / std::shared_lock<Mutex>::try_lock_forstd::future<T>::wait_for / std::future<T>::wait_untilstd::shared_future<T>::wait_for / std::shared_future<T>::wait_until
线程间同步的应用 比起简单的将数据暴露出来给多个线程共享,使用函数式编程是可以简化代码的一个好方法。
函数式编程与std::future 下面以快速排序为例,来展示函数式编程是如何做到多线程安全的。
c 代码实现快速排序 快速排序思路如下:
选择数据的一个点作为 pivot 与其他数做比较
小于 pivot 的数放一边,大于或等于 pivot 的数放另外一半
递归的进行步骤 2,递归的终止条件便是当前需要判断的数组值只有 1 个时,排序便完成了
下面是一个简易的 c 代码示例:
1 2 3 4 5 6 7 8 9 10 11 12 13 14 15 16 17 18 19 20 21 22 23 24 25 26 27 28 29 30 31 32 33 34 35 36 37 38 39 40 41 42 43 44 45 46 47 48 49 50 51 52 53 54 55 56 57 58 59 60 61 62 63 64 65 66 #include <stdio.h> #include <stdint.h> static void swap (int *a, int *b) int tmp = *a; *a = *b; *b = tmp; } static int partition (int *buf, int p, int r) int i = p; for (int j = p; j <= r - 1 ; j++) { if (buf[j] < buf[r]) { if (i != j) { swap(&buf[j], &buf[i]); } i++; } } swap(&buf[i], &buf[r]); return i; } static void quick_sort_frame (int *buf, int p, int r) if (p >= r) { return ; } int q = partition(buf, p, r); printf ("quick_sort p = %d, r = %d, q = %d\n" , p, r, q); for (int i = p; i <= r; i++) { printf ("%d," , buf[i]); } printf ("\n" ); quick_sort_frame(buf, p, q - 1 ); quick_sort_frame(buf, q + 1 , r); } static void quick_sort (int *buf, int size) quick_sort_frame(buf, 0 , size - 1 ); } #define BUF_SIZE 10 static int buf[BUF_SIZE];int main (int argc, char *argv[]) printf ("before sort, buffer contents are:\n" ); for (int8_t i = 0 ; i < BUF_SIZE; i++) { buf[i] = BUF_SIZE - i; printf ("%d," , buf[i]); } printf ("\n" ); quick_sort(buf, BUF_SIZE); printf ("after sort, buffer contents are:\n" ); for (int8_t i = 0 ; i < BUF_SIZE; i++) { printf ("%d," , buf[i]); } printf ("\n" ); return 0 ; }
其输出为:
1
2
3
4
5
6
7
8
9
10
11
12
13
14
15
16
17
18
19
20
21
22
before sort, buffer contents are: 10,9,8,7,6,5,4,3,2,1, quick_sort p = 0, r = 9, q = 0 1,9,8,7,6,5,4,3,2,10, quick_sort p = 1, r = 9, q = 9 9,8,7,6,5,4,3,2,10, quick_sort p = 1, r = 8, q = 1 2,8,7,6,5,4,3,9, quick_sort p = 2, r = 8, q = 8 8,7,6,5,4,3,9, quick_sort p = 2, r = 7, q = 2 3,7,6,5,4,8, quick_sort p = 3, r = 7, q = 7 7,6,5,4,8, quick_sort p = 3, r = 6, q = 3 4,6,5,7, quick_sort p = 4, r = 6, q = 6 6,5,7, quick_sort p = 4, r = 5, q = 4 5,6, after sort, buffer contents are: 1,2,3,4,5,6,7,8,9,10,
c++ 代码实现快速排序 1 2 3 4 5 6 7 8 9 10 11 12 13 14 15 16 17 18 19 20 21 22 23 24 25 26 27 28 29 30 31 32 33 34 35 36 37 38 39 40 41 42 43 44 45 46 47 48 49 50 51 52 53 54 #include <iostream> #include <list> #include <algorithm> template <typename T>std::list<T> sequential_quick_sort (std::list<T> input) { if (input.empty ()) { return input; } std::list<T> result; result.splice (result.begin (), input, input.begin ()); T const & pivot = *result.begin (); auto divide_point = std::partition (input.begin (), input.end (), [&](T const & t){return t < pivot;}); std::list<T> lower_part; lower_part.splice (lower_part.end (), input, input.begin (), divide_point); auto new_lower ( sequential_quick_sort(std::move(lower_part))) auto new_higher ( sequential_quick_sort(std::move(input))) result.splice (result.end (), new_higher); result.splice (result.begin (), new_lower); return result; } int main () std::list<int > vals = {10 , 9 , 8 , 7 , 6 , 5 , 4 , 3 , 2 , 1 }; std::cout << "contents of vals before sort:\n" ; for (auto v : vals) { std::cout << v << "," ; } std::cout << "\n" ; vals = sequential_quick_sort (vals); std::cout << "contents of vals after sort:\n" ; for (auto v : vals) { std::cout << v << "," ; } std::cout << "\n" ; return 0 ; }
可以看到,与上面 c 版本的实现思路是完全一样的,只是有标准库的加持,使得代码看起来更为简洁。
并行实现快速排序 以上的 c++ 代码是由一个线程来完成了,如果可以由多个线程来完成并行排序便可以更加快速的得出结果。
这里就需要考虑到 data race 的问题了,使用std::future是一个比较优雅的解决方案。
由于每次分为两个部分后,又需要对这两个部分递归,所以将其中一个部分分离为一个单独的线程是可以提供并发度的:
1 2 3 4 5 6 7 8 9 10 11 12 13 14 15 16 17 18 19 20 21 22 23 24 25 26 27 28 29 30 31 32 33 34 35 36 37 38 39 40 41 42 43 44 45 46 47 48 49 50 51 52 53 54 55 56 57 58 59 #include <iostream> #include <list> #include <algorithm> #include <future> template <typename T>std::list<T> sequential_quick_sort (std::list<T> input) { if (input.empty ()) { return input; } std::list<T> result; result.splice (result.begin (), input, input.begin ()); T const & pivot = *result.begin (); auto divide_point = std::partition (input.begin (), input.end (), [&](T const & t){return t < pivot;}); std::list<T> lower_part; lower_part.splice (lower_part.end (), input, input.begin (), divide_point); std::future<std::list<T>> new_lower ( std::async (&sequential_quick_sort<T>, std::move (lower_part)) ); auto new_higher ( sequential_quick_sort(std::move(input))) result.splice (result.end (),new_higher); result.splice (result.begin (),new_lower.get ()); return result; } int main () std::list<int > vals = {10 , 9 , 8 , 7 , 6 , 5 , 4 , 3 , 2 , 1 }; std::cout << "contents of vals before sort:\n" ; for (auto v : vals) { std::cout << v << "," ; } std::cout << "\n" ; vals = sequential_quick_sort (vals); std::cout << "contents of vals after sort:\n" ; for (auto v : vals) { std::cout << v << "," ; } std::cout << "\n" ; return 0 ; }
由于两个线程分别是处理两边的数据,也不会有 data race 的情况出现。
这里需要注意的是线程的并发数量,是递归的 2^n 次方。
比如递归 10 次,线程的数量就是 1024 个。
所以,要根据当前硬件所支持的并发数来决定是使用std::launch::deferrred还是std::launch::async。
默认情况下不填这项,那就依赖编译器的实现来完成不同的策略。
如果要使用纯 c 来实现这个并行方式,则需要更多的代码且不易维护。
通过消息传递来完成同步 CSP(Communicating Sequential Process)编程方式就是指:以消息传递的方式在各个线程间共享数据。
每个线程当前的状态根据接收到的消息而定,在处理消息时各个线程都是完全独立的而不会有 data race 的情况出现。
这种方式使得并发编程变得简单而易于维护。
这个过程中的临界资源便是消息队列,可以使用类将其封装起来而易于使用。
一个比较简单的示例如下:
1
2
3
4
5
6
7
8
9
10
11
12
13
14
15
16
17
18
19
20
21
22
23
24
25
26
27
28
29
30
31
32
33
34
35
36
37
38
39
struct card_inserted { std::string account; }; class atm { messaging::receiver incoming; messaging::sender bank; messaging::sender interface_hardware; void std::string account; std::string pin; void waiting_for_card () interface_hardware.send (display_enter_card ()); incoming.wait () .handle<card_inserted>( [&](card_inserted const & msg) { account = msg.account; pin = "" ; interface_hardware.send (display_enter_pin ()); state = &atm::getting_pin; } ); } void getting_pin () public : void run () state = &atm::waiting_for_card; try { for (;;) { (this ->*state)(); } } catch const &) { } } };
可以看到:
一个线程只执行当前的状态,状态的切换并不会引起临界区的问题
多个线程都维护自己的状态,这使得并发逻辑变得非常简单
唯一需要注意的便是消息队列的互斥问题